Cinnamon Roll Oatmeal Bars: A Journey From Chaos to Comfort
The first time I tried to make Cinnamon Roll Oatmeal Bars, I was standing in my kitchen, all excitement, and maybe a tad too much faith in my baking abilities. Not to brag, but I thought I was a seasoning guru—how hard could following a recipe be? Well, let’s just say I learned that some days you’re the baker, and some days, you’re just a messy flour explosion waiting to happen. I’m telling you, I vapor-locked on the whole thing, and it felt like I’d just witnessed my dreams of culinary success slip down the drain (or rather, down the side of the mixing bowl).
There I was with flour dust in my hair and a mixture that could have easily been mistaken for cement. My friend Emma walked in, took one look at the disaster zone that was my kitchen, and said, “You know, sometimes the best things come from a little chaos.” Fast forward to now, and here I am, passing on the wisdom to you—not just the recipe for these delightful bars, but the reassurance that even disasters can lead to something beautiful. Let me save you from that first awful attempt and turn those kitchen nightmares into a sweet embrace!
Why This Recipe Matters
Cinnamon Roll Oatmeal Bars aren’t just a snack; they’re a hug in the form of food. These bars are what to bake when you crave comfort but don’t want to spend the entire day in the kitchen. Maybe you’re pressed for time between school runs, work meetings, and whatever life throws at you (hello, laundry piles!).
These bars bring that nostalgic scent of warm cinnamon and sugar wafting through the house, reminding us of cuddly Sunday mornings and lazy afternoons. They are perfect for breakfast, a lunchbox treat, or even a midnight snack (not that I’ve ever done that at all… cough). So let’s make some magic together!
Before You Start
-
If you inadvertently buy quick oats instead of rolled oats, don’t panic. Just adjust the liquid content slightly as quick oats absorb more moisture.
-
The one tool that makes this infinitely easier is a 9×13-inch baking dish—I nearly forgot it once, and the bars were a weird, flat disaster. Trust me on this!
-
If your toddler starts melting down because you’ve momentarily lost your patience while mixing, just let them stir the oats with their own bowl of dry ingredients! It keeps them occupied and feels like a little cooking lesson.
-
Wine pairs wonderfully as you bake these, especially if it’s a Friday. But if it’s a Tuesday (or, you know, any day), a cup of tea does wonders too.
Ingredients List
-
2 cups rolled oats (I use the supermarket’s own brand—that means more money for wine, am I right?)
-
1 cup all-purpose flour (Sometimes I sneak in whole wheat if I’m feeling particularly healthy.)
-
1 tsp baking powder (Just to give these bars a little lift; we’re not making pancakes here!)
-
1 tsp ground cinnamon (The star of the show—no shortcuts here, folks!)
-
½ cup brown sugar (Must be packed; I like it to have that molasses flavour—who doesn’t love a touch of sweetness?)
-
½ cup maple syrup (Because I have a deep love affair with everything maple-flavoured.)
-
½ cup coconut oil, melted (You can use the kind you actually buy instead of the fancy hippie stuff, but I’d skip the parched toes in favour of the smooth texture.)
-
2 large eggs (They’re like the glue that holds the magic together!)
-
1 cup Greek yogurt (I prefer the unflavoured kind because I’m not all about that overly fruity vibe in my oatmeal bars.)
-
1 tsp vanilla extract (This is my secret weapon for taking everything to the next level.)
-
½ cup chopped pecans or walnuts (Optional, but trust me, you want that crunch!)
-
For the icing:
-
1 cup powdered sugar (Because let’s be honest, it’s all about the icing.)
-
2 tbsp milk (Or enough to get your icing to that perfectly drizzly consistency.)
-
½ tsp vanilla extract (Just a touch, like an accent over a masterpiece.)
-

Step-by-Step with Stories
Step 1: Gather the Ingredients
Grab your baking dish and preheat your oven to 350°F (175°C).
Why this step matters: Prepping your space means no frantic searching halfway through. Don’t do what I did and try to find the flour while your butter’s on its own “melting down.”
Common mistake here: People usually forget to prepare their baking dish. I once used a non-stick pan and went from “cookie disaster” to “cookie cement.”
My personal hack: While the oven preheats, take a moment to set the table so when these bars are ready, you’re already in the zone for a lovely presentation!
The sensory cue: You’ll know the oven is ready when you hear that satisfying ‘ping’ that signals it’s time to shine.
Step 2: Mix Dry Ingredients
In a large bowl, combine the oats, flour, baking powder, cinnamon, and brown sugar.
Why this step matters: This helps to distribute all the dry ingredients evenly, so no surprises in the form of a cinnamon explosion once baked.
Common mistake: Not stirring it enough and getting a horrible mouthful of a floury clump. Trust me, it’s a “learn from my mistakes” kinda thing.
Anecdote: I always feel like a wizard here, mixing magical ingredients together. My son Jake thinks I’m conducting a potion—little does he know, it’s just breakfast!
Step 3: Combine Wet Ingredients
In another bowl, whisk together the maple syrup, melted coconut oil, eggs, Greek yogurt, and vanilla extract until smooth.
Why this step matters: Properly mixing your wet ingredients ensures everything comes together smoothly and avoids clumps.
If you’re multi-tasking: You can sneak in your dairy-packed coffee while you whisk. It’s fuel, am I right?
Step 4: Incorporate Wet and Dry Mixtures
Pour the wet mixture into the dry mixture, and mix until barely combined. Don’t overdo it; we’re going for a "just met" vibe, not a seasoned marriage.
Why this step matters: Over-mixing can lead to tough bars, and nobody wants that—my first batch was proof of this rule.
My grandma used to say: “Keep it gentle like you’d handle a newborn.” It’s true, I swear.
Step 5: Add Extras
Now toss in those nuts if you’re using them. Mix just enough to distribute evenly.
Why this step matters: The nuts add laudable texture—like the unexpected twists in a good book!
Step 6: Pour into the Dish
Spread the batter into your prepared baking dish. It might feel rebellious to not smooth it out completely, but trust me on this! A little rustic look adds character.
Common mistake: Trying to get it too smooth—it’s an oatmeal bar, not a pizza!
Step 7: Bake
Pop it in the oven for about 20-25 minutes or until a toothpick comes out clean.
The sensory cue: You’ll know it’s almost time when your kitchen starts smelling like a cinnamon haven, and you can’t help but sneak a taste of the air.
Anecdote: This is the time I usually dance around the kitchen… ungracefully, I might add—let’s just keep that between us.
Step 8: Mix the Icing
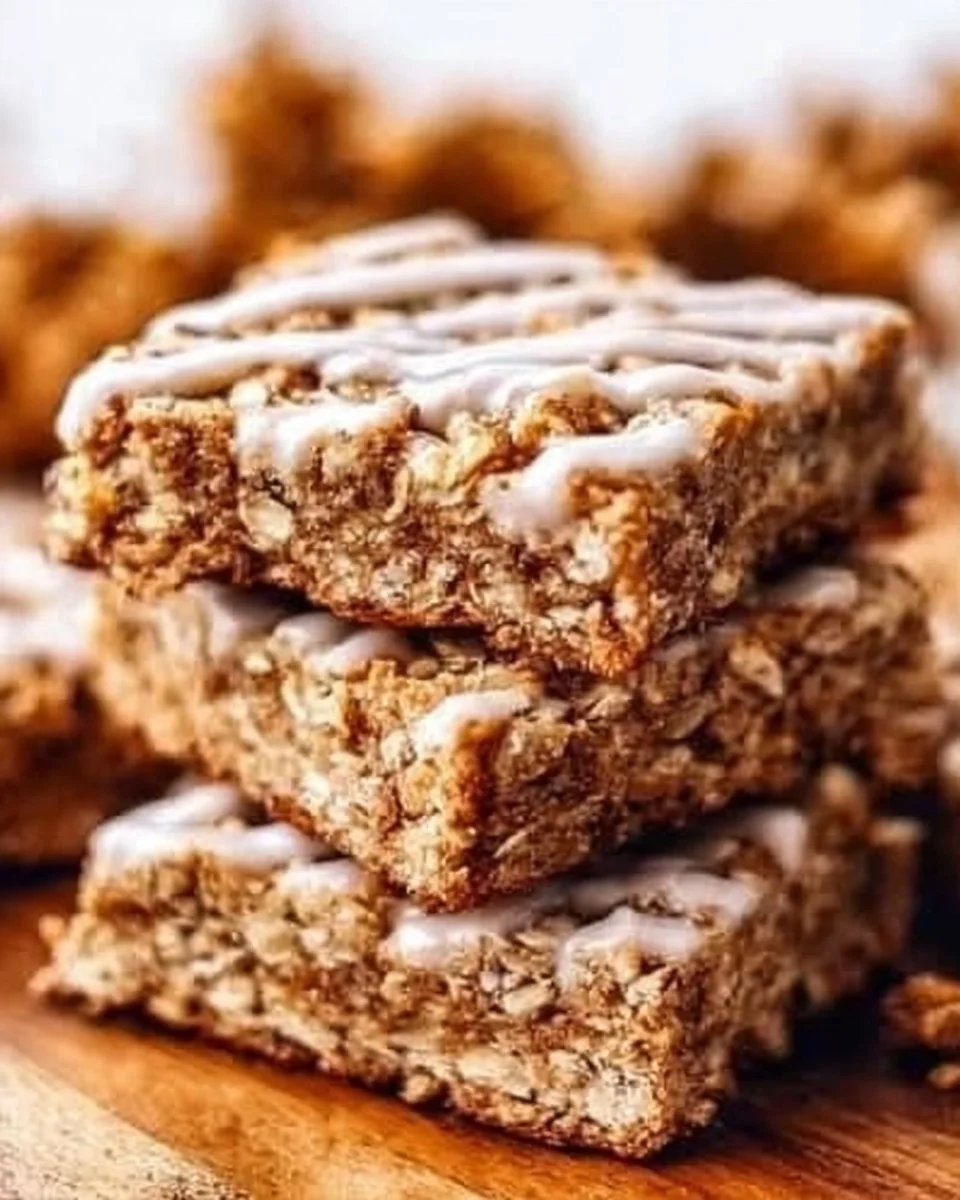
In a small bowl, whisk together the powdered sugar, milk, and vanilla until smooth. Drizzle it over the bars once they cool.
Why this step matters: The icing turns simple bars into a show-stopping treat. Plus, who can resist that glossy appeal?
Troubleshooting Real Life
-
If you burn the bottom: Slice off the burned edges and insist it’s the new rustic-style. (No judgment here!)
-
If you’re out of maple syrup: Honey or agave nectar is a perfectly good substitute, not that I’d ever let that happen to me (ahem).
-
If you need to pause: Just cover the mixture and pop it back in the fridge while you deal with whatever life throws your way—be it a toddler tantrum or an unexpected visitor!
-
If it’s just not working: Order takeout with no guilt! Sometimes the best “bar” is just a local pizza.
Serving Story
I serve these bars in my favourite vintage tin that literally says “cookies!” because, well—isn’t that just slice-of-life perfection?
The perfect side is a dollop of Greek yogurt or just a steaming cup of your go-to tea, but honestly, we often gobble it straight from the pan (don’t judge!).
And let’s be real, leftovers taste even better because they soak up that incredible flavour overnight. So don’t worry about making an extra batch!
When I Make This
I usually whip these up on a Sunday afternoon because baking while the sunshine filters in feels like a mini celebration of sorts. While it cooks, I sometimes catch up on a podcast or fold a mountain of laundry that’s been staring at me with judgement.
We eat it all together at the dining table with a candle flickering away—maybe even game night if we’re lucky!
The cleanup takes about 15 minutes, but honestly, I find it soothing. Plus, the satisfaction of the empty dish is so worth it!
Conversational Close
This Cinnamon Roll Oatmeal Bars recipe has seen me through my messy baking days, family brunches, and even those “What on Earth are we having this week?” moments. It might not be perfect, but it’s mine, and it’s packed with love.
I’d love to hear if you make it! Tag me or just enjoy it quietly. What’s your go-to comfort food? Mine switches around, but right now, I can’t get enough of these delightful bars.
Let’s connect over culinary stories and maybe a few kitchen mishaps; after all, that’s where the magic lives! 🌼

Cinnamon Roll Oatmeal Bars
Ingredients
Method
- Preheat your oven to 350°F (175°C) and prepare a 9x13-inch baking dish.
- In a large bowl, mix together the oats, flour, baking powder, cinnamon, and brown sugar.
- In another bowl, whisk together the maple syrup, melted coconut oil, eggs, Greek yogurt, and vanilla extract until smooth.
- Combine the wet and dry mixtures, being careful not to over mix.
- If using, fold in the chopped nuts.
- Spread the batter into the prepared baking dish.
- Bake for 20-25 minutes or until a toothpick comes out clean.
- Once cool, whisk together the powdered sugar, milk, and vanilla until smooth and drizzle over the bars.