
Asian-Style Tuna Cakes with Spicy Mayo: A Memory on a Plate
The first time I tried to make tuna cakes, let’s just say it was a complete disaster. Picture this: a young, inexperienced cook (me) standing in my cramped kitchen—a can of tuna in hand, staring at a recipe that seemed to require a degree in culinary arts. I miscalculated the amount of soy sauce (I was too overzealous) and ended up creating a salty, slippery mess that I’m pretty sure my cat wouldn’t touch. Then, as I stood there feeling defeated, my partner walked in and said, “Why don’t you just embrace the chaos?” That moment turned everything around for me. I didn’t need to be perfect; I just needed to cook with heart. Now, these Asian-style tuna cakes are what I whip up when I need a little boost of comfort and creativity in my kitchen.
Why This Recipe Matters
Let’s be real for a second—sometimes we just need food that sparks joy without requiring hours of preparation. These tuna cakes are not just a meal; they’re a canvas for creativity. They’re what you make when you’re feeling a bit uninspired but need to impress your dinner guests (or just your family after a long workday). Pair them with a zesty spicy mayo, and trust me, everyone will think you spent hours crafting this deliciousness when, in reality, you’ll put together a delightful meal in just half an hour. Can you hear the applause already?
Before You Start
- If you’ve got only canned tuna in oil instead of water, no worries! The oil adds an even richer flavour to your cakes—just drain it well.
- A good non-stick frying pan is your best friend for this recipe. You probably already have one hidden in your cupboard that’ll do wonders for preventing stickiness and ensuring golden-brown perfection.
- What to do if your toddler has a meltdown mid-recipe? Trust me, I’ve been there! Keep some frozen peas on standby; they require zero prep, and you can turn this into a fun little snack while things calm down.
- Wine pairing: Go for a Pinot Grigio if you’re treating yourself (or making it a weekday treat). If you’re cooking during the day and need a pick-me-up, I recommend green tea!
Ingredients List with Personal Notes
- 2 cans of tuna (I usually go for the John West brand because their tuna tastes the best by far, but whatever’s in the pantry works!)
- 1 cup breadcrumbs (I make my own from leftover bread, but store-bought will do in a pinch)
- 1/2 cup green onions, chopped (spring onions, if you’re fancy. They add such a fresh kick!)
- 1 egg (a little bit of stickiness to hold everything together—don’t skip it!)
- 2 tbsp soy sauce (I use Kikkoman, it’s the only soy sauce I truly trust!)
- 1 tsp sesame oil (just enough to give that Asian flair—can we talk about the aroma?)
- 1/2 cup bell peppers, diced (I use red because they look cute, but yellow’s great too)
- 1 tsp garlic powder (it’s a fast way to get that garlicky goodness without peeling)
- Salt and pepper to taste (this is where you channel your inner chef)
- For the spicy mayo:
- 1/2 cup mayonnaise (I can’t resist Hellmann’s!)
- 1-2 tsp sriracha (adjust according to your spice tolerance; add a bit more for a pep talk!)

The Step-by-Step with Stories
Step 1: Drain and Rinse the Tuna
Practical Instruction: Open your cans of tuna, drain them well, and give them a quick rinse to remove excess salt.
Why This Step Matters: This is crucial for avoiding overly salty cakes. No one wants to bite into a cake and feel like they just swallowed the ocean!
Anecdote: The first time I skipped this step, I could barely finish my own creation. My daughter, Lucy, looked at me with giant eyes and said, “Mum, this isn’t food; it’s a shipwreck!”
Step 2: Mix All Ingredients Together
Practical Instruction: In a large bowl, add in the drained tuna, breadcrumbs, green onions, egg, soy sauce, sesame oil, diced bell peppers, garlic powder, salt, and pepper. Mix until everything is combined.
Common Mistake Here: It’s easy to either overmix or undermix. You want it just combined—too much mixing can lead to rubbery cakes, and no one wants that!
My Personal Hack: Use your hands! It sounds messy, but it’s the best way to get everything evenly distributed. I even keep a bowl of soapy water nearby for easy clean-up.
Step 3: Shape the Cakes
Practical Instruction: Form the mixture into small patties, about the size of your palm.
Sensory Cue: You’ll know it’s ready when they hold together and don’t crumble at the slightest touch.
Anecdote: I learned that roughly shaped cakes work too! My friend Sarah once made hers look like small mountains, and they were a hit at a potluck. Just own it!
Step 4: Frying Time
Practical Instruction: Heat a non-stick frying pan over medium heat and add a drizzle of oil. Cook the tuna cakes for about 4-5 minutes on each side or until golden brown.
Common Mistake Here: Turning them too soon! Let them sit so they form a crust before flipping. Trust me; patience pays off!
If You’re Multi-Tasking: This is a great time to start whisking up the spicy mayo.
Step 5: Make the Spicy Mayo
Practical Instruction: In a small bowl, mix mayonnaise with sriracha until you reach your desired level of spiciness.
The Secret Nobody Tells You: Add a splash of lime juice to brighten up the mayo flavour—you’re welcome!
Troubleshooting Real Life
- If you burn the bottom: Don’t panic! Transfer your cakes to a clean plate, cover them with a kitchen towel, and let them rest for a bit. Sometimes, the bottom is just too crispy, but the insides might still be perfect!
- If you’re out of sriracha: You can use any hot sauce you have on hand, or even some sweet chili sauce works in a pinch.
- If you’ve got kids’ emergencies: Just take a step back. You can keep the patties in the fridge for about 20 minutes until you’re ready to finish cooking!
The Serving Story
I like to serve these cakes on a rustic wooden platter; it just feels more exciting. For a bit of flair, I garnish with extra chopped green onions and a squeeze of lime juice right before they hit the table. The perfect side is a simple cucumber salad—fresh and crunchy, which balances out the richness of the cakes! And honestly, if it was a long day, sometimes we eat these straight from the pan.
When I Make This
I usually whip these up on a Friday evening, ready to celebrate the weekend. While they sizzle away, I might put on a podcast or catch up with my husband over a glass of wine. We usually eat at our coffee table while watching a lighthearted rom-com (no judgement, please). The clean-up takes about 15 minutes, but it’s totally worth it when I see everyone enjoying their food.
The Conversational Close
This recipe has seen me through countless weekday blues and kitchen hurdles (remember that one time I mistook sugar for salt!). It might not be perfect, but it’s mine with all the imperfections that come along with it. I’d love to hear if you give this a go—just tag me or enjoy it quietly with a satisfied smile. What’s your go-to comfort food? Mine changes, but right now, it’s definitely this one.
I hope this post has you feeling inspired and ready to dive into the delicious world of Asian-style tuna cakes. You got this, and I’ll be cheering you on every step of the way!
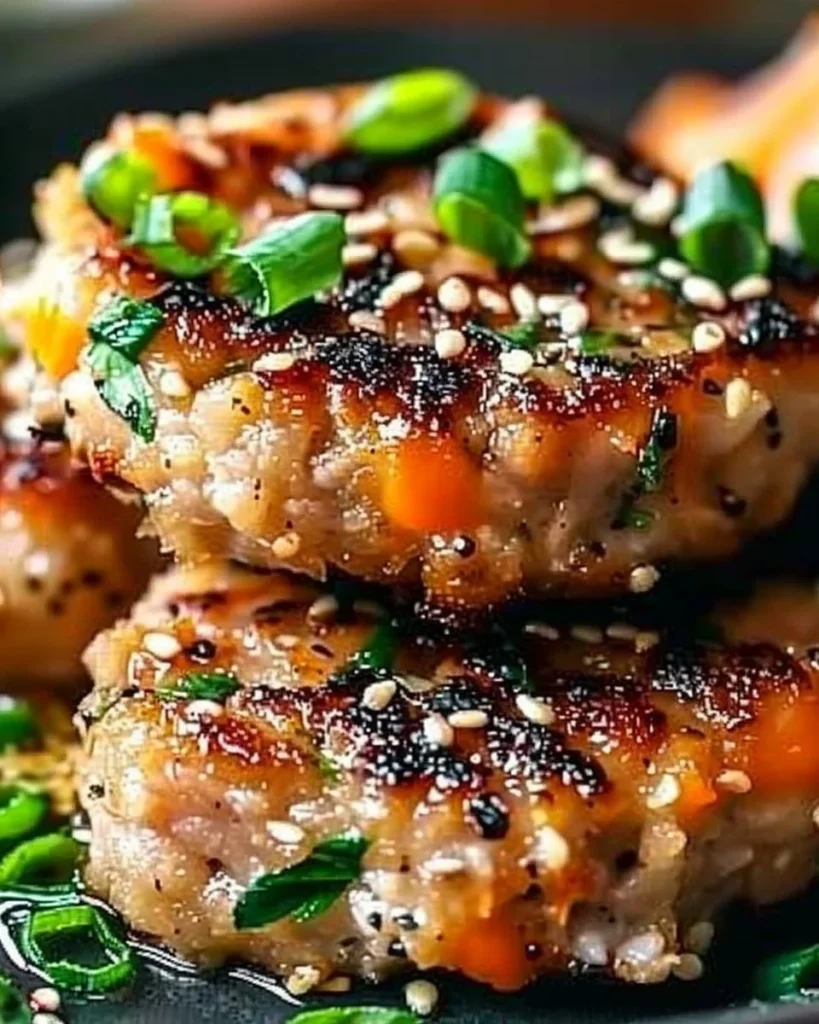
Asian-Style Tuna Cakes
Ingredients
Method
- Drain and rinse the tuna to remove excess salt.
- In a large bowl, mix the drained tuna, breadcrumbs, green onions, egg, soy sauce, sesame oil, diced bell peppers, garlic powder, salt, and pepper until combined.
- Form the mixture into small patties, about the size of your palm.
- Heat a non-stick frying pan over medium heat and add a drizzle of oil. Fry the tuna cakes for 4-5 minutes on each side, or until golden brown.
- While the cakes are cooking, whisk together the mayonnaise and sriracha in a small bowl for the spicy mayo.
- Serve the tuna cakes on a rustic wooden platter, garnished with extra green onions and a squeeze of lime juice.
- Pair with a simple cucumber salad for a refreshing side.