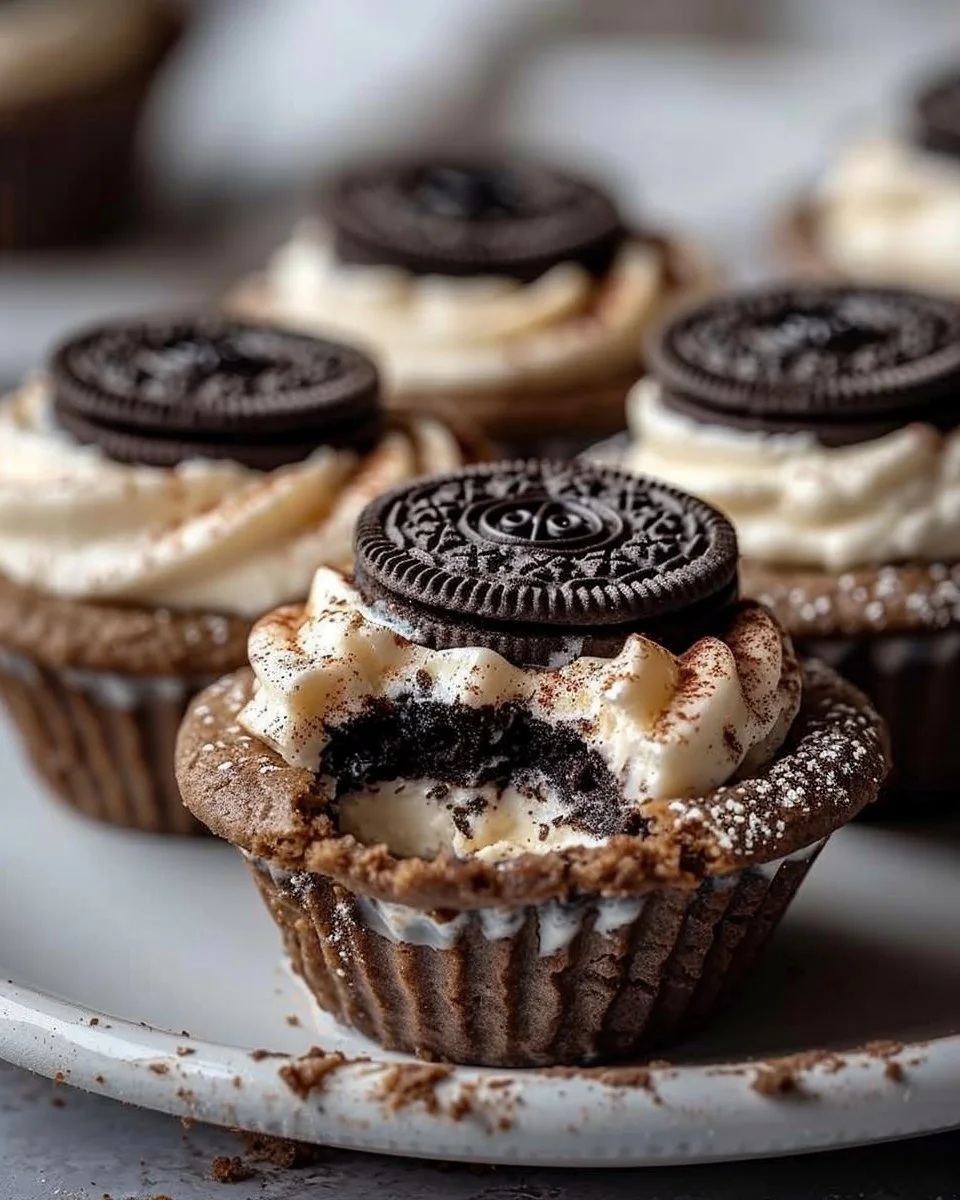
Oreo Cheesecake Cookie Cups: A Sweet Love Letter to the Imperfect
The first time I made these Oreo Cheesecake Cookie Cups, I ended up with a kitchen disaster of epic proportions. I mean, we’re talking flour on the ceiling, and my mixers were practically begging for mercy. It was a Tuesday—one of those days where my kids were bouncing off the walls, and I just wanted a few quiet moments with a cup of tea and a decent dessert. Instead, my son decided that was the moment to have a full-on meltdown over a missing Lego piece.
In the middle of trying to calm him down, I managed to spill an entire canister of powdered sugar everywhere. My husband walked in, took one look at the chaos, and said, “Well, at least you’re trying!” That was about seven years ago. Now, when I whip these up, it’s like I’m bringing a little slice of joy to my kitchen (and possibly a minor freak-out to my family). Let me save you from that first abominable attempt and guide you through the secret to making these little delights.
Why This Matters
Okay, let’s be real. We’re all trying to juggle work, family life, and the inevitable chaos of modern parenting. These Oreo Cheesecake Cookie Cups are your go-to when you want to impress someone but also require something so ridiculously easy that even someone who burned toast can handle it. Trust me on this one. It’s the dessert that screams, “I might be a mess, but check out my cookie cups!” and it’s practically effortless to whip up.
Maybe you need something sweet for a friend’s birthday, or perhaps your kids have been particularly crunchy that day. Whatever the occasion, these cookies are here with a side of “I got this.”
Before You Start
- If you’re elbow-deep in life and can’t find your mixing bowl, a large mug will do in a pinch (I’m not judging, promise).
- The secret nobody tells you? A hand mixer makes this so much easier—I swear by my old KitchenAid. But if you’ve got a whisk and some elbow grease, that’ll work too.
- What to do if your child starts a mini drama midway through? Set a timer for five minutes and try to engage them in cookie magic. Bonus points if you have chocolate chips on standby.
- Coffee is your friend while cooking this—or maybe even a cheeky glass of wine if you’re feeling fancy.
Ingredients
- 1 cup Oreo cookies, crushed (I usually grab the family pack; it makes indulging easier)
- 2 tbsp butter, melted (because everything’s better with butter, right?)
- 8 oz cream cheese, softened (I use Philadelphia, just because that’s how my mom did it)
- 1/2 cup powdered sugar (tricky stuff, but you’ll find it hiding in the back of your pantry)
- 1 tsp vanilla extract (always go for good quality; it makes a difference, I promise)
- 1/2 cup cool whip or whipped cream (weekend treat? Go full-fat. I won’t tell.)
- Extra Oreos for topping (because let’s be honest, can you have too many Oreos?)
Step-by-Step with Stories
Step 1: Preheat Your Oven
Practical Instruction: Preheat your oven to 350°F (or 175°C for my fellow Brits).
Why this step matters: Preheating ensures your cookie cups cook evenly, so they don’t end up a gooey mess.
Common mistake here: Forgetting to preheat and just assuming it’ll come together in the pan. Spoiler alert: it won’t.
My personal hack: I like to set my oven a bit early, about 10 minutes before I even start mixing. That way, I nip the extra time in the bud.
Sensory cue: You know it’s ready when there’s a subtle warmth wafting through, and maybe a little puff of flour has escaped from your mixing bowl.
Anecdote: This is where I usually pour myself a cup of coffee, and then I realize that I should’ve poured it before. Classic me!
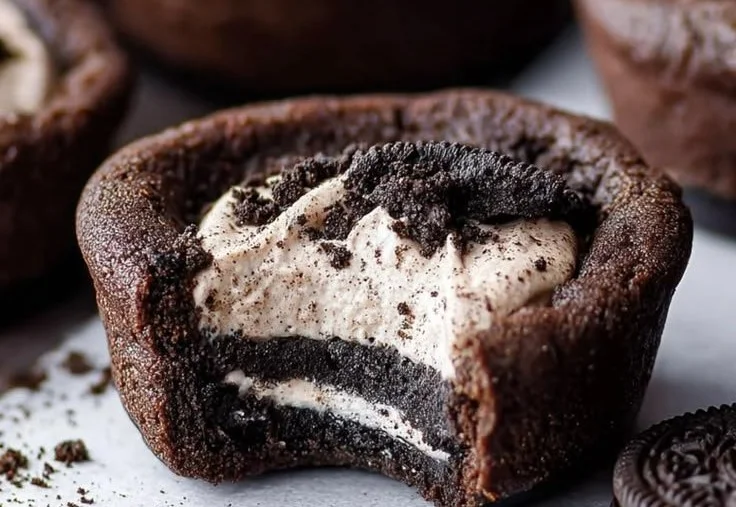
Step 2: Make the Crust
Practical Instruction: In a bowl, combine your crushed Oreos and melted butter until it looks like damp sand.
Why this step matters: This crust is the backbone of your cookie cups. It holds all the cheesy goodness inside while still giving a satisfying crunch.
Common mistake here: If you don’t crush your Oreos enough, they’ll end up all clunky and won’t hold the shape. Just like that time my sister-in-law brought a lumpy cake to the party (but we loved her anyway).
My personal hack: I toss the Oreos into a freezer bag and crush them with a rolling pin. It’s oddly therapeutic.
Sensory cue: When mixed properly, it should look like a beach sandcastle. Just make sure not to bite into it… or you might think twice.
Step 3: Press into Muffin Tins
Practical Instruction: Spoon about a tablespoon of the Oreo mixture into each cavity of a muffin tin and press down firmly.
Why this step matters: A good crust holds everything together. This takes a little muscle, but it’s worth it.
Common mistake here: Not pressing hard enough will leave you with a crumbly situation. You don’t want your cookie cups to crumble away like a forgotten New Year’s resolution.
My personal hack: I use the base of a measuring cup to press down evenly. It’s the perfect tool, and you won’t hear me saying “Oops!” every couple of seconds.
Anecdote: My son loves helping with this part. He thinks it’s like making mini sandcastles—and he’s not wrong.
Step 4: Bake the Crust
Practical Instruction: Bake your cookie cups for about 10 minutes until they’re set.
Why this step matters: This melts the crust just enough to hold everything in place without turning it into a rock.
Common mistake here: Forgetting that they’ll harden a bit more after baking. I lost a full set of nails during one disaster—I might’ve been tempted to try one too soon.
My personal hack: Set a timer! I’m known to get lost in thought (or Netflix), so timers are essential for my sanity.
Anecdote: This is when I start planning my next binge-watch session. It’s like a mini celebration of multitasking.
Step 5: Make the Cheesecake Filling
Practical Instruction: In a mixing bowl, beat the softened cream cheese until smooth. Then add powdered sugar and vanilla extract. Beat until combined.
Why this step matters: This filling is the creamy indulgence you’re after. You want it to be silky smooth.
Common mistake here: Not fully softening your cream cheese. If it’s too cold, you’ll end up with little cream cheese lumps, which can kill off your dreams.
My personal hack: Microwave the cream cheese for about 15 seconds before mixing, but don’t let it get hot.
Sensory cue: When smooth and mixed together, it should look like a pillow for your taste buds.
Anecdote: The first time I made this, I mixed and mixed, and still ended up with lumps. I swore I’d never make it again—so much for that!
Step 6: Fold in the Cool Whip
Practical Instruction: Gently fold in the Cool Whip until fully combined, but don’t overdo it.
Why this step matters: This step adds that light and fluffy texture that makes your filling divine.
Common mistake here: Mixing too vigorously can turn it into a gloppy mess. Just think “gentle waves” in your mixing bowl—easy does it.
Anecdote: One time, I got carried away and suddenly felt like I was fighting a whipped cream battle as it splattered everywhere. Lesson learned? Respect the Cool Whip.
Step 7: Scoop the Cheesecake Filling into Crusts
Practical Instruction: With a spoon or piping bag, fill each cookie cup with the cheesecake mixture.
Why this step matters: This is your moment! You’re filling each cup with pure bliss.
Common mistake here: Overfilling leads to a messy top. Speak to it gently to avoid overflow (I wish I were joking).
My personal hack: I use a muffin scoop for even portions. Trust me, it makes your life easier (and these look far cuter).
Anecdote: My daughter always sneaks in to grab a spoonful of the filling when I’m not looking. “You’d be amazed how much you can eat in that 15 seconds of distraction.”
Step 8: Top with Extra Oreos
Practical Instruction: Crush additional Oreos and sprinkle them on top of the cheesecake filling for that final touch.
Why this step matters: It’s the delectable cherry on top of your cookie masterpiece.
Common mistake here: Forgetting the topping altogether. You’re only cheating yourself out of that extra crunch.
Anecdote: I learned this after cringing at a presentation that lacked the pop of colour. Now, no topping leaves me feeling a little off.
Step 9: Cool and Serve
Practical Instruction: Refrigerate your cookie cups for at least an hour before serving.
Why this step matters: They need time to set properly—like all of us when we need a moment to breathe (or eat dessert).
Common mistake here: Acting like it’s a race. Resist the urge to dive right in. The waiting is the hardest part.
Anecdote: When waiting, I sometimes settle in with a book. If it’s been a long day, the cookie cups are my reward for surviving.
Troubleshooting Real Life
- If you burned the crust: It happens! Just crumble it up and use it as a sundae topping.
- If you’re out of icing sugar: Granulated sugar will do in a pinch, but you’ll want to blend it into a fine powder first.
- If you need to pause because of a kid emergency: Just pop the filling in the fridge and cover it. It’ll be there waiting, just like how I wait for evening snacks.
- If it’s not working: Listen, we’ve all been there. Just embrace the idea of taking a break, and maybe order a pizza instead—nobody will judge.
Serving Story
I serve these in little square dessert cups because, why not? They look cute and fancy, and I get to pretend I’m at a dinner party, even if it’s just me and a pile of laundry. Sometimes, we eat them on the couch, all cozy with movie nights, where I pretend these are totally healthy because they have something nutritious in them… right?
Leftovers taste even better, too (they do!), so don’t hold back. Trust me, these will not last long in your fridge.
When I Make This
I usually whip these up on Sunday evenings, right after I make my kids’ lunches for the week. I’ll maybe throw in some laundry or call my mom—we’ve definitely had more than a few conversations about cookie cups. While these are baking, I multitask like a pro, even managing to have a sit-down with my husband about our week ahead (with a cookie cup in hand, obviously).
Cleanup takes about 15 minutes, and honestly, it’s worth the glorious treat waiting for you at the end.
The Conversational Close
These Oreo Cheesecake Cookie Cups have seen me through countless family gatherings, birthdays, and even those evenings when I really needed a pick-me-up. They might not be Michelin-starred, but they’re mine, complete with all the warmth and love from my somewhat chaotic kitchen.
So whether you’re diving into cooking for the first time or you’re a seasoned pro looking to shake things up, I’d love to hear about your own adventures in the kitchen. Tag me or drop me a note. What’s your go-to comfort food? Mine changes, but right now? You guessed it—it’s these beauties.

Oreo Cheesecake Cookie Cups
Ingredients
Method
- Preheat your oven to 350°F (or 175°C).
- In a bowl, combine the crushed Oreos and melted butter until it resembles damp sand.
- Spoon about a tablespoon of the Oreo mixture into each cavity of a muffin tin and press down firmly.
- Bake the cookie cups for about 10 minutes until set.
- In a mixing bowl, beat the softened cream cheese until smooth. Add powdered sugar and vanilla extract, then beat until combined.
- Gently fold in the Cool Whip until fully combined.
- Fill each cookie cup with the cheesecake mixture using a spoon or piping bag.
- Sprinkle crushed Oreos on top of the cheesecake filling.
- Refrigerate your cookie cups for at least an hour before serving.